In this Topic Hide
Within the NowPrint application, an item is considered any product or production service that could have a cost associated with it. There are three categories of items.
This category of items consists of paper, impressions, bindery, front and back covers, tabs and separators, warehoused items, and fees. With the exception of “fee” and “impression” item types, all of the items in this category can be physically inventoried. One other concepts to note is the inter-relationship that these items may have with one another. The page size and page count of the documents identified, can affect whether an item can be selected by a requestor based on relationship mappings.
Advanced Finishing Option Items
These items are typically service oriented in nature and are performed off-line after printing has completed. They are considered advanced because an average order would not make use of these items. In fact the average requestor may be unaware of their existence or at least how to apply them to their order. The application allows for these items to be selected and often require special detailed instructions from the requestor to indicate the exact application of the finishing option to their order. The availability of these items is independent of the documents that were specified in the order. Examples of these items include folding, cutting, and drilling.
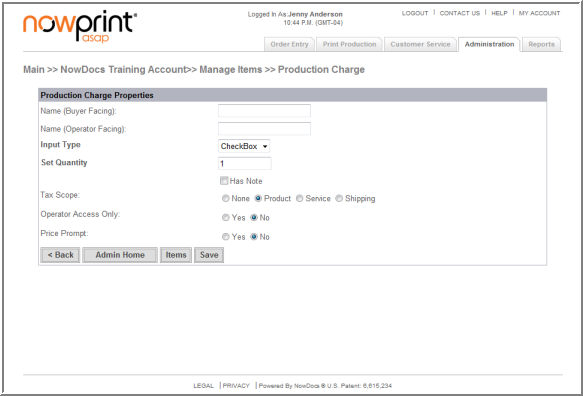
Production Charges Items
These items are typically labor efforts performed by the production staff. These items are never displayed during the Order Entry process. They can only be applied by the production staff after the order has been submitted, and result as additional line items to the order for billing purposes. These items are independent of any option that was selected during the Order Entry process by the requestor. Examples of these items include typesetting, spell checking, and project management.
One important concept is the use by the application of the product name and the product description. A general rule is that the product name is always what is displayed within the Order Entry portion of the application, and the Description is always what is displayed within the Print Production portion of the application. If there are items with the same product name that could be displayed within the Order Entry, then the application will filter out only uniquely named ones to be displayed. As an example, when the admin is setting up bindery options, there could be several different sizes of a particular bindery option. The admin can add the various sizes keeping the name the same, but the text used in the description would be unique based on the specific size. For instance Black GBC Coil has several different sizes that are measured in millimeters ranging from 6mm to 25mm. It would be confusing to the requestor if the application required them to have to choose the specific millimeter size of the coil to accommodate their document(s). Instead the application displays Black GBC Coil only once. If the requestor chooses this bindery type, then the application will determine which specific Black GBC Coil item should be used. This logic is based on matching the page count of the document(s), with the value indicated in the max pages field listed for the paper selected for that bindery option.
Paper items have special relationships to two other item types; binders and impressions. The requirement for this relationship exists to allow the application to perform logic to guide the requestor in selecting the right options for their order.
The relationship between paper and bindery is required to indicate which binder options should be displayed as valid options after the user has selected a particular type of paper. For instance if the requestor chose a multipart carbonless paper, GBC Comb binding is not a logical binding option that should be displayed. Additionally if a document consisted of 300 printed pages, then there would be a limited number of bindery options that could be used due to the thickness of the 300 sheets of paper. The appropriate relationships can be defined in the “Mapped Items” section to indicate whether the items have a relationship, and then further define the max page count that a particular bindery option can accommodate for that specific paper item.
The relationship between paper and impressions is a bit more straightforward. Impressions are defined as the ink/toner applied to a single side of media (paper, transparency, etc). Generally speaking there are two types of impression; Black & White, and Color. The application accommodates the admin to define the relationship between every paper item defined and an impression. This is particularly handy when impressions are accounted for based on paper size. Additionally there may also be the case where a paper should not be printed using Color ink/toner.
With the installation of NowPrint, common items are preloaded into the site. A user with Master Account administrative privileges can add and modify items within the application at the Master Account level. This area allows the admin to define the item’s attributes and global pricing. If the Master Account has multiple Corporate Accounts, items can be defined either globally or restricted to a specific Corporate Account. If item pricing is specific to a particular corporation, then items can be mapped to that corporation with different prices defined.
Corporate Account administrators can select which items are available and the applicable pricing at the Corporate Account level.
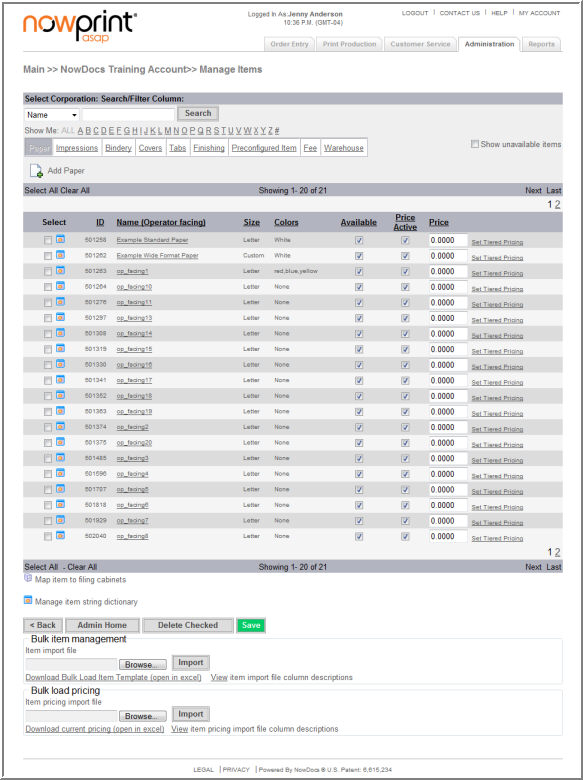
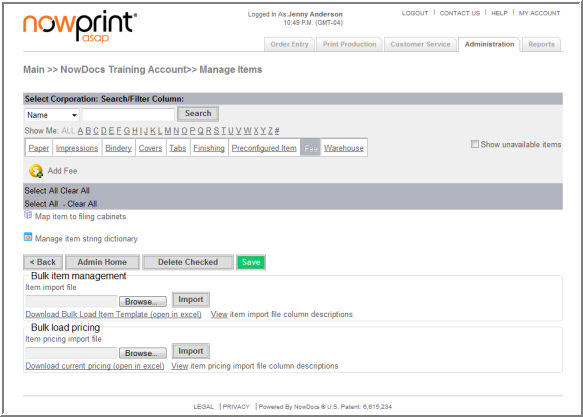
Delete Checked – allows users to delete selected items.
Bulk Item Management, import – allows users to upload items in bulk using the Bulk Load Item Template.
Bulk Item Management, item pricing – allows users to update pricing in bulk using the Download Current Pricing template.
Items can be edited at the Corporate Account level if the Master Account Administrator has given rites to the Corporate Account Administrator.
Use the following steps to manage items:
Click the Admin link from the NowPrint homepage.
Click the Edit link under the Items option.

Restrict Availability – click the availability checkbox for the item to remove it from the Corporate Account options.
Price Active – click the price active checkbox to make the pricing active at the Corporate Account level.
Price – enter a price for the item.
![]() Click
here to watch a short video on Managing Items
Click
here to watch a short video on Managing Items
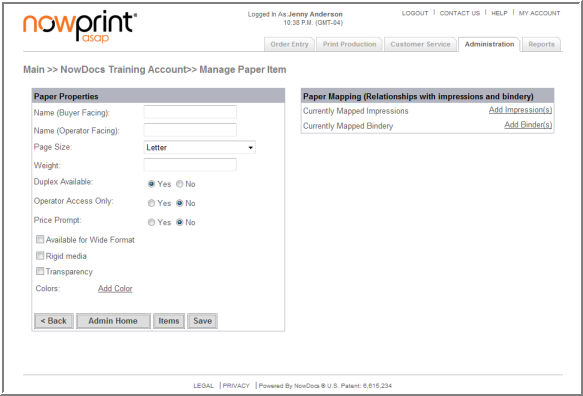
Use the following steps to add paper items:
Click the Admin link from the NowPrint homepage.
Click the Edit link under the Items option.
Click the Add Paper icon.
Note: If the system detects the page size of an uploaded document that is not a standard size, it will always assume a “Custom” size. However if there are no paper items in the system that have been created as a “Custom” size, then the application will return an error message back to the user indicating that the document is incompatible and cannot be submitted. In order to accommodate non-standard page sizes, a separate paper item will need to be created with the designation of its paper size being “Custom.”
![]() Click here to watch a short video on Adding Paper
Items
Click here to watch a short video on Adding Paper
Items
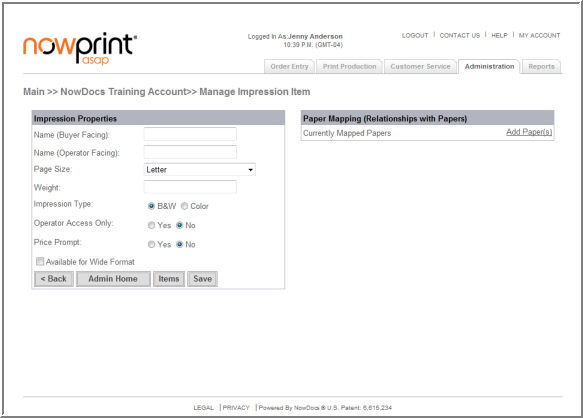
Use the following steps to add impression items:
Click the Admin link from the NowPrint homepage.
Click the Edit link under the Items option.
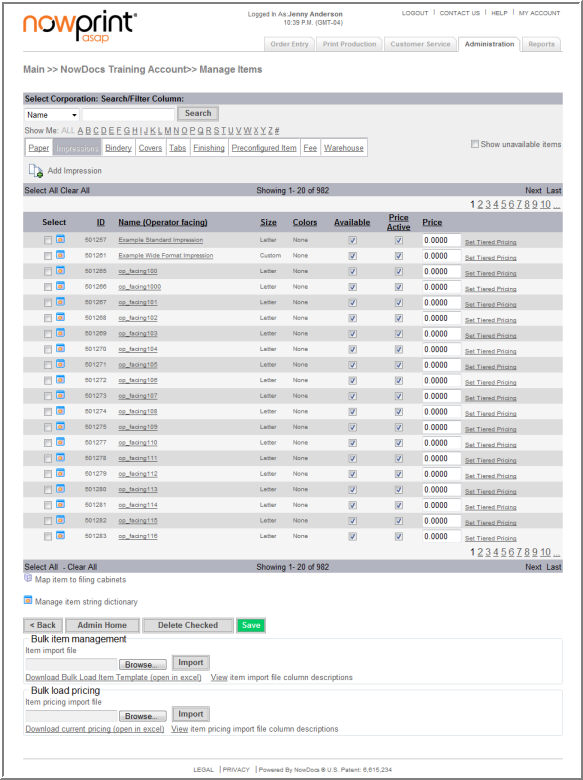
Click the Impressions link.
Click the Add Impressions icon.
Use the following steps to add bindery items:
Click the Admin link from the NowPrint homepage.
Click the Edit link under the Items option.
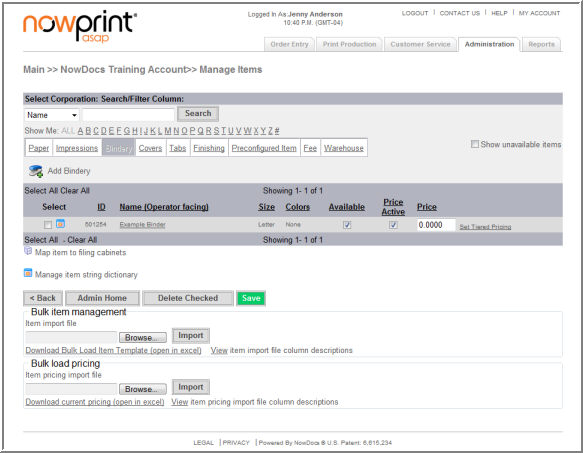
Click the Bindery link.
Click the Add Bindery icon.
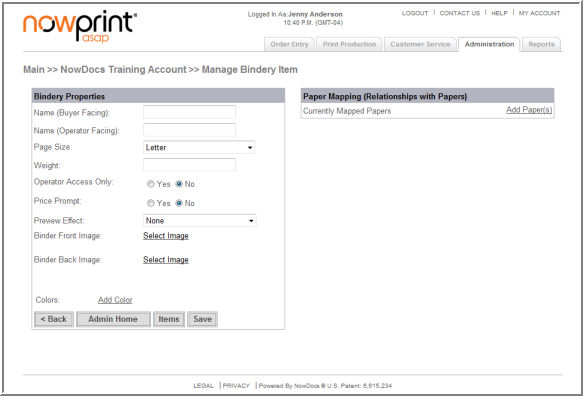
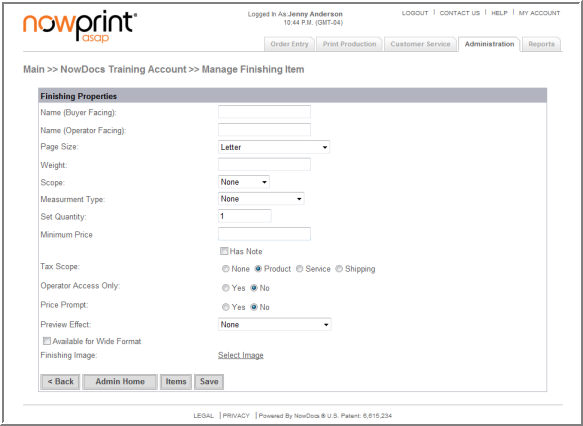
Name (Buyer Facing) – The text displayed in the drop down list within Order Entry for the item.
Name (Operator Facing) – The text displayed on the Job Ticket for the item.
Page Size – Correlates to standard page sizes. Options are Letter, Legal, 11X17, A4, A3, and Custom.
Weight – The weight in ounces of the item. This field is defaulted to 0.000, and it is not currently used in any calculation logic within the application.
Operator Access Only – By checking this box, the item will be hidden within Order Entry and will only be available while performing adjustments within Print Production.
Price Prompt – Price Prompt – Use the Price Prompt option to indicate whether the operator will be required to enter a price for the item during the fulfillment process
Preview Effect – select the option to be displayed in the dynamic preview on the AdHoc Workflow.
Binder Front Image – select the option to be displayed in the dynamic preview on the AdHoc Workflow.
Binder Back Image – select the option to be displayed in the dynamic preview on the AdHoc Workflow.
Colors – This text is displayed alongside the binder selection that indicates the colors for which the binder is available. Adding the text and then clicking the “Add Color” button will add the color to the binder.
Colors Select Box – This box displays colors that have been added, and allows for the removal of a color if necessary.
Remove – Selection of a color followed by clicking this button will remove the color from the list.
Mapped Items Table – This table will display all Paper items that have been added to the system. Selecting the box beside a particular item will map the binder to that item. Modifying the “Max Pages” field for each item indicates the number of sheets of paper that can be accommodated by binder for that paper item. The value of “999999999” indicates that there is no limitation in the relationship between the two items.
Save/Cancel - Click the Save button to apply the configuration.
![]() Click
here to watch a short video on Adding Bindery Items
Click
here to watch a short video on Adding Bindery Items
Use the following steps to add cover items:
Click the Admin link from the NowPrint homepage.
Click the Edit link under the Items option.
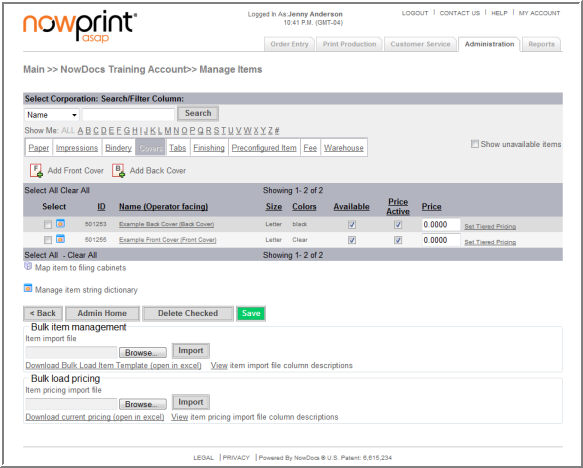
Click the Covers link.
Click the Add Front Cover or Add Back Cover icon.
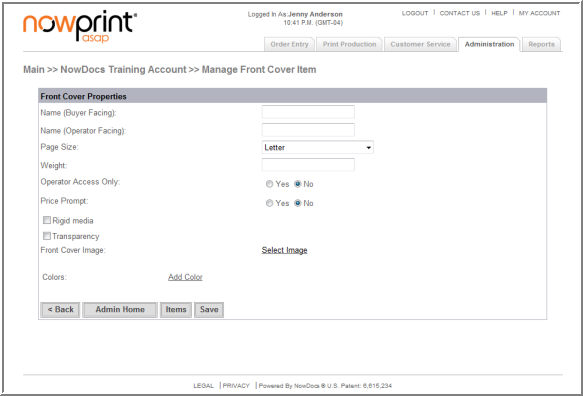
Name (Buyer Facing) – The text displayed in the drop down list within Order Entry for the item.
Name (Operator Facing) – The text displayed on the Job Ticket for the item.
Page Size – Correlates to standard page sizes. Options are Letter, Legal, 11X17, A4, A3, and Custom.
Weight – The weight in ounces of the item. This field is defaulted to 0.000, and it is not currently used in any calculation logic within the application.
Operator Access Only – By checking this box, the item will be hidden within Order Entry and will only be available while performing adjustments within Print Production.
Price Prompt – Use the Price Prompt option to indicate whether the operator will be required to enter a price for the item during the fulfillment process
Rigid Media – used to designate a plastic cover or sheet. In the active preview that image won't bend when you're turning the pages.
Transparency – Preview for this cover would be transparent
Front Image – Clicking this link renders a new page that allows for a mapping of an image that represents the image of the front or back cover. Several of the most common cover images are already included in the system, but new ones can be uploaded as well.
Colors – This text is displayed alongside the cover selection that indicates the colors for which the cover is available. Adding the text and then clicking the “Add Color” button will add the color to the cover.
Colors Select Box – This box displays colors that have been added, and allows for the removal of a color if necessary.
Remove – Selection of a color followed by clicking this button will remove the color from the list.
Save/Cancel - Click the Save button to apply the configuration.
![]() Click here to watch a short video on Adding Covers
Click here to watch a short video on Adding Covers
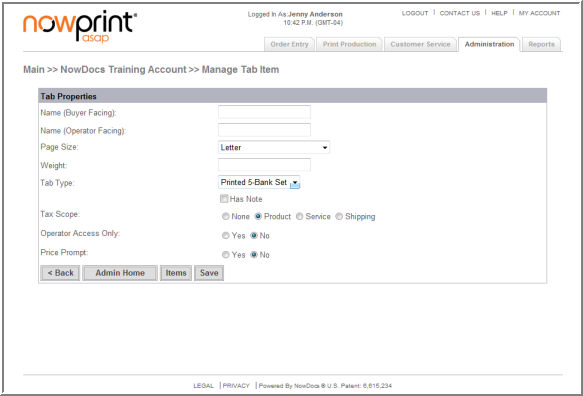
Use the following steps to add tab items:
Click the Admin link from the NowPrint homepage.
Click the Edit link under the Items option.
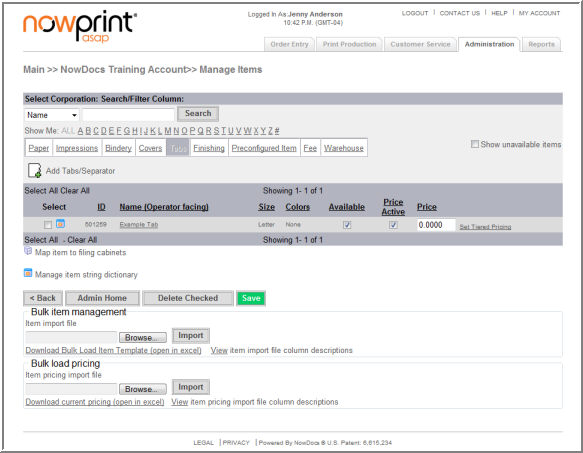
Click the Tabs link.
Click the Add Tabs/Separator icon.
Use the following steps to add finishing items:
Click the Admin link from the NowPrint homepage.
Click the Edit link under the Items option.
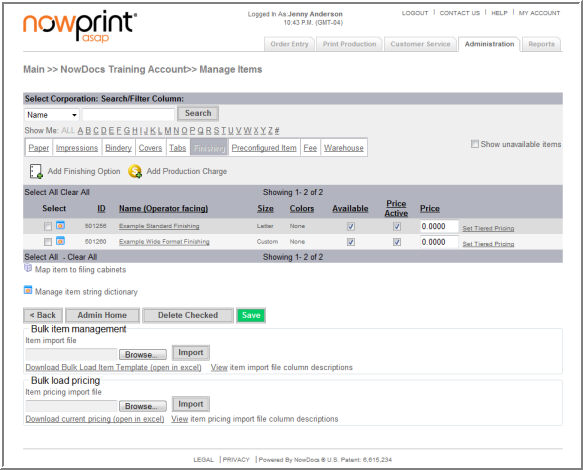
Click the Finishing link.
Click the Add Finishing Option icon.
![]() Click here to watch a short video on Adding Finishing
Items
Click here to watch a short video on Adding Finishing
Items
Add Production Charges
Use the following steps to add finishing items:
Click the Admin link from the NowPrint homepage.
Click the Edit link under the Items option.
Click the Finishing link.
Click the Add Finishing Option icon.
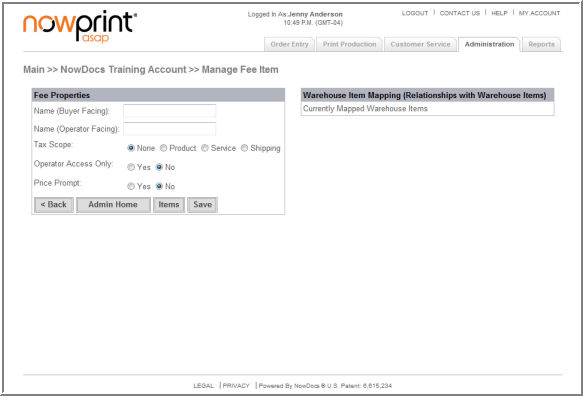
Use the following steps to add fees items:
Click the Admin link from the NowPrint homepage.
Click the Edit link under the Items option.
Click the Fees link.
Click the Add Fee icon.
![]() Click here to watch a short video on Adding Fees
Click here to watch a short video on Adding Fees
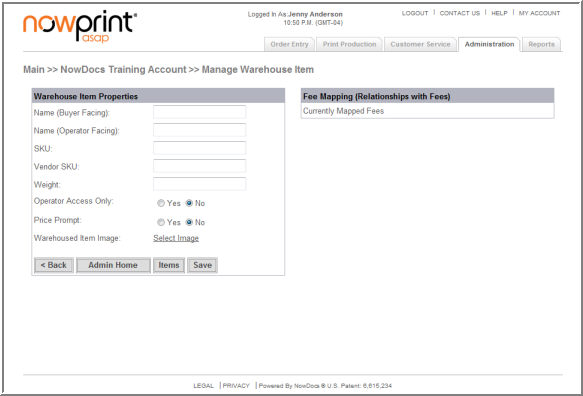
Warehouse items are physical objects that are not necessarily related to printing. These items are typically inventoried in a warehouse as pick-n-pack items that are kitted together. Warehouse items can be associated with fee items. When a warehouse item that is associated with a fee is ordered, the user is charged the fee in addition to the cost of the warehouse item. In addition, warehouse items can be mapped to file cabinets in order to make them available in that file cabinet for selection during the ordering process.
Use the following steps to add warehouse items:
Click the Admin link from the NowPrint homepage.
Click the Edit link under the Items option.

Click the Warehouse link.
Click the Add Warehoused Item icon.